How to measure your kitchen for a remodel
If you’re planning a remodel, measure your current kitchen accurately to create a design that can be executed perfectly, bringing your dream kitchen to life.
How well you measure your kitchen can be a factor in how smoothly your kitchen remodel goes. If you don’t get your measurements right, your design won’t come to life as expected. Because it’s so important, many of our clients request Bath Plus Kitchen’s Measurement Services, available with our Standard and Ultra Kitchen Design Services packages. This prevents issues such as:
- Gaps between pieces (e.g., between countertop and stove).
- Not enough space to accommodate certain features comfortably, such as a kitchen island.
Want to learn how to do it yourself? This blog will guide you through it.
Keep in mind that if you don’t measure your kitchen correctly, you may be able to fit everything you wanted into your kitchen space, but it won’t be a perfect fit. Accuracy here is essential while preparing for a remodel. It makes for a better experience, which is why one of our custom cabinet lines has even developed a special system for flexibility and ease-of-use. Proper measurements help your kitchen designer work out the best way to create a kitchen for you that functions seamlessly and looks fantastic.
When our designers at Bath Plus Kitchen meet with a new client, getting a clear picture of the current kitchen helps them make their best recommendations for the space. To plan the perfect kitchen remodel, we offer guidance on measuring the space and compiling ideas. Once we have a clear picture of what you’re looking for and the space we’d be working with, we can get to work.
Read: What a kitchen remodel timeline typically looks like
Try these tips on measuring your kitchen accurately to prepare for your kitchen remodel!
What you will need
1. Tape measure
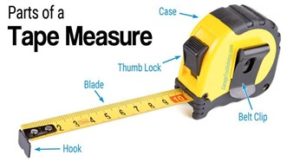
Tape measure, image from garagetooladvisor.com
Chances are, you know how to use a tape measure. You’ve probably used one for various projects around the house, but here are a few tips to make it easier:
- Make friends with the lock button – While you may be able to take quick measurements by keeping the tape extended, the lock button will improve accuracy and also allow you to pause to note your measurements down comfortably.
- Try out the belt clip – This one’s straightforward; use it to avoid a tape measure hunt in the middle of mapping out your kitchen!
- Use the hook tab – Where possible, hook the tape onto whatever you’re measuring, so you can check if everything is aligned before you note down a measurement. When used together with the lock button, you can double check each measurement to make sure it’s accurate before moving on to the next one.
- Get familiar with the tape measure marks – Many tape measures have lines/marks of various lengths to indicate units of measurement. If you haven’t done so yet, look closely at the little lines between every inch on the tape. This varies, but you may find marks for 1/16”, 1/8”, 1/4″, 1/2″, and 1”. Some even have a black arrow for every foot. Keeping this in mind can make it easier to count as you measure.
2. Straightedge
You’ll need one to draw the layout of your current kitchen, indicating measurements.
3. Graph paper
Along with written measurements, a graph or grid paper is a great way to help explain your current kitchen’s layout to your designer. Of course, your remodel team will do their own measurements, but greater accuracy from the get-go can only make things easier! Get started with these tips:
Use our free downloadable graph paper to measure your kitchen
- Measure the perimeter of the room to frame your drawing.
- Based on this, decide on your scale key and make a note of it. For example, you could decide that every square represents 5 inches. You can then create a drawing to scale.
4. Pencil(s)
A simple pencil and eraser will get the job done. However, feel free to use colored pencils or markers to make your drawing more detailed.
A few general tips on measuring your kitchens
- Measure clockwise – Start at the top left corner of your drawing and then start measuring clockwise, marking all the measurements clearly.
- Label walls, windows, and doors with numbers and codes – Add descriptions and labels to facilitate your discussion with your designer.
- Find the center of all permanent features – This will help you measure items such as windows, doors, big appliances, as well as plumbing and electrical components.
- Measure horizontally and vertically – Take horizontal measurements from halfway up your walls. Vertical measurements are important as well, where you can note the total height as well as a breakdown of measurements. For example, if measuring a window, you can measure from the floor to the window trim, then window height, and finally from the top of the window to the ceiling. You can add these up and check if it matches the total height of that wall. Cross-checking measurements like this will improve accuracy.
- Include the trim for windows and doors – When you measure windows and doors, include the trim or frame in your measurements.
What to measure
Once you’ve put together your supplies, you can move on to measuring and drawing.
Step 1 – Create a floor plan
Keeping in mind your scale key, draw the perimeter of your room. Everything else can be detailed out from there. Getting the perimeter right is important because it lets the designer know how much space they’re working with.
Next, mark the windows, doors, and archways. Be sure to indicate which way they open, and whether they lead outside or into another part of the house. This will give your kitchen designer a sense of the basic usable space, the shape of your kitchen, and whether or any part of the kitchen can be opened out.
Step 2 – Create a wall plan
Measure the exact length of each wall. To do this right, measure the length in 3 places:
- Along the floor
- Halfway up the wall
- At the ceiling
Why measure the same thing thrice? For the most part, walls are not perfectly square. This means that the three measurements you just took can be off by a few inches.
Use the widest of the three measurements for your wall plan. This is what you’ll use to order your kitchen cabinetry to avoid any awkward gaps. It’s a good idea to inform your kitchen designer about all three measurements, to give them a full picture of what they’re working with.
Your designer will also need to know what’s on the other side of each wall, so note that down as well. For example, if the living room is on the other side of one wall, you could label it “interior wall” and write “living room” outside it. Similarly, you can label a wall an “exterior wall” if the other side of it is the outside of your house.
Step 3 – Make note of any obstacles
Think of this as telling your kitchen designer more about your walls and what’s connected to them. Some items to note are:
- Gas and electricity meters
- Boilers
- Radiators
- Extractor fans
- Appliances
- Water stopcock
- Plug sockets
- Light switches
- TV sockets
Measure their width from their widest point, and mark their position on the wall. Of course, you may need professional help to get some of these, but try to identify as many as you can.
Step 4 – Measure the windows
While measuring windows, be sure to include the trim. Start measuring from the top left corner of your drawing, and go clockwise.
- Measure the distance between that corner and the edge of the window trim and mark that on the diagram.
- Then, measure the width of the window and mark that. Label it ‘Window #1’.
- Keep going clockwise until every window has been marked,
- Then, get the height and width of each window
- Also measure vertically, noting the distance between the floor and the bottom of each window and the distance between the top of the window and the ceiling.
The objective here is to get the size and placement of all windows.
Step 5 – Measure the doorways
This is similar to the way you measured windows. Again, start measuring from the top left corner of your drawing.
- Measure the distance between that corner, halfway up the wall, and the edge of the door trim. Mark that on the diagram.
- Then, measure the width of the door and mark that. Label it ‘Door #1’.
- If there’s more than one door on a wall, measure again from the left corner to the edge of the second door’s trim; i.e., don’t just measure between doors.
- Keep going clockwise until every door has been marked.
- Then, get the height and width of each door. For the height, measure from the floor up to the top edge of the door trim. Note these details down, with additional diagrams if possible.
Step 6 – Pipes, vents, outlets, switches
When you discuss your new kitchen with your designer, you’ll probably talk about new appliances and features you’d love to have in your dream kitchen. To tell you what’s possible and what will need rewiring or replumbing, a kitchen designer needs to know the dimensions and positions of the key items. You can share the locations of:
- Electrical switches
- Sockets
- Drainpipes
- Venting ductwork
As with measuring doors and windows, start in the left-hand corner. On every wall, identify the plumbing and electrical items. Measure from the corner to the center of the item and mark it on your drawing.
Step 6 – Final check
Now it’s time to check if your measurements are accurate. If you have a rectangular room, it would follow that parallel walls are the same length. You could check if the measurements match and measure again if something seems off. Take a look around your kitchen and compare it to your drawing to see if you’ve represented it correctly.
Once you give your kitchen designer the measurements and your ideas, you can move on to the exciting part – designing your dream kitchen! We’d love to hear what you have in mind and introduce you to our process. Get in touch with us to learn how we can transform your kitchen.
Key sources