Brighten Up! How to Coordinate Your Kitchen with White Cabinets

White shaker cabinets Washington DC

White cabinets are a classic option for kitchen design and are very popular. They not only increase the size of a small kitchen and brighten any room, but they can also give a larger kitchen a more unified appearance. White cabinetry adds a sophisticated dimension to your new or remodeled kitchen project. It is cheerful and upbeat. White in the kitchen is a favorite of creative designers because it gives small touches of creativity a chance to shine.
The question is, how do you match them up with the rest of your kitchen? Here are a few simple tips.

Pros and Cons

White cabinets have the advantage of making even the smallest spaces feel larger and more open. Regardless of your preferred style or trend, let’s not forget the clean, classic look. When combined with the ideal countertop, backsplash, and flooring, white cabinets can serve as a unified, polished anchor in small to large kitchen spaces.

Of course, there are a few drawbacks to a kitchen that is predominantly white that should be taken into account. Working with a trained kitchen remodeling contractor in Austin, Dallas, or wherever you are, is a great idea because, for example, a white-washed kitchen might come off as cold, harsh, or just unwelcoming! Invest in quality custom craftsmanship made by professionals in this field. Such kitchen cabinets come with a lot of options to pick from. Their extensive selection of custom cabinetry options gives you limitless flexibility in terms of door styles, wood species, paint or stain choices, etc.

Don’t forget to incorporate your lifestyle into the design process as well. For the clumsy home cook, white cabinets might not be the best option. The same applies if having a kitchen that requires little maintenance is a top priority, as spills, drips, or an occasional spritz of cola, tomato sauce, or yellow mustard may eventually stain or change the color of white cabinetry.

Layers of shades of white

Mixing whites will help you look less sterile. The room might look flat if only one color is used. Instead, pick three or four different shades of white and apply them to various surfaces throughout the kitchen. This will give the room depth and interest throughout.

Avoid blending warm and cool whites when bringing in various shades of white. Cool tones appear bluer, while warm tones appear more yellow. The majority of paint retailers will display their warm and cool whites separately, making it easier for you to locate whites that belong to the same category.

Pick the appropriate color of paint

When choosing a paint color for your walls, white cabinets will reflect light and may appear brighter than other colors. For walls next to white cabinets, light blues, greens, and grays are all excellent choices.

With dark accents, you can also add contrast. Along with having light colors in the kitchen to go with the white cabinets, contrast should also be added. Dark accents can help the room feel more interesting and deep. Examples include black cabinet hardware or a black granite countertop.

Make Use of Natural Lighting

A white kitchen benefits greatly from natural light from windows or skylights because it enhances the light and airy atmosphere you were going for in the first place.

The large set of windows above the sink allows plenty of light to filter in throughout the day, which is why this white kitchen gets better. Glass fronts on the upper cabinets magnify the light. This design element makes use of all that light by reflecting it throughout the area and into nearby rooms.

Tip: Window coverings in adjacent rooms can also make a difference. Use shades that can be fully raised during the day if you want to. Even more natural light will enter your kitchen as a result of this.

Materials

Use counters with light colors. Another key component of the kitchen that can work with white cabinets is the countertops. Light-colored countertops made of marble, quartz, or laminate will help to make the room appear bigger and more coordinated.

The use of complementary textures is another option. When choosing kitchen accessories, try to use textures that go well together. A difference can also be made by joining rooms. Use shades that can be fully raised during the day if you want to. Even more natural light will enter your kitchen as a result of this.

White kitchen cabinets are simple to maintain, making them ideal for families with active children. They’re a great option if you want to modernize your house.

Designer Insights: 12 Steps to a Typical Kitchen Remodel Process

Typical Kitchen Remodel

Designer Insights: 12 Steps to a Typical Kitchen Remodel Process

The prospect of a new and improved kitchen is an exciting one, but taking the plunge isn’t always an easy decision. Our team at Bath + Kitchen, Washington, DC created this overview to help our clients understand what a typical kitchen remodeling process looks like based on our experience as a full-service design-remodel firm and authorized Dura Supreme Cabinetry Showroom.

Aside from the investment and inconvenience, two of the top fears around kitchen remodels are the fear of disappointment and the fear of being misled by a contractor. I believe these concerns should not hold you back from creating the kitchen of your dreams. Instead, I recommend doing your homework and learning as much as you can about the kitchen design process. When you understand the workflow, you will be in a position to collaborate successfully with your contractor and understand what’s happening at every step of your kitchen’s transformation.

See this video for a great example of a kitchen remodel project by Bath Plus Kitchen.

Step 1: Set goals for your remodel

What are you hoping to achieve through this kitchen remodeling project? Here are a few goals our clients often share with us:

  • Creating a kitchen that suits their lifestyle
  • Increasing resale value
  • Incorporating smart appliances to create a more future-friendly kitchen
  • Improving functionality, so home-cooked meals become an inviting option
  • Updating the space’s look, especially for older kitchens

Defining a goal will help you share your vision more clearly with your kitchen remodeling contractor. It helps to write it out as a goal statement and share it with everyone involved. You can then revisit the document at every step to ensure you’re on track and making choices in line with your vision. Very often, the remodel is planned with a big event on the horizon. For example, one of our clients in NW Washington, DC wanted theirs completed before their baby boy was born. We completed this kitchen remodel project with them in 8 weeks, just a few weeks before they welcomed the newest member of their family home.

Dura Supreme Kitchen design by Bath Plus Kitchen

Step 2: Evaluate your existing kitchen

With a clear goal in mind, you can approach your Dura Supreme kitchen designer and together you can evaluate your goals and your existing kitchen. If you’re not sure how to evaluate them, start with these questions. At the Bath Plus Kitchen showroom, our selection process is a curated one that’s designed to ensure each project is a good match for the homeowner and the designer. If you explain your goals clearly, it will be easier for the designer to tell you if they will be able to execute the project to your satisfaction and budget.

Once you have identified your kitchen remodel team, you will need to work with them to assess your current kitchen. The aesthetics are the first thing to evaluate. Ask yourself what you love about it and what you want to change. In addition, consider these factors:

  • Space – do you have enough counter, cabinet, and floor space?
  • Flow – is it easy to navigate, cook with family members, and interact with guests?
  • Appliances – should you upgrade to energy-saving, easier-to-use appliances?
  • Accessibility – can family members of various ages and use it safely, including yourself as you get older? What about people with disabilities?
  • Children and pets – do you need to make any special provisions for them?

Step 3: Design your dream kitchen

With a clear vision of your future kitchen, you can proceed to the fun part – designing! Yes, you will need to be realistic, stick to your budget, and make adjustments for any limiting factors, but a good kitchen designer can help you find creative solutions to give you a kitchen you will fall in love with. It’s important to be flexible and open to new possibilities during the kitchen design process. However, you should also stand firm on what you really want. For example, what kind of layout works for you? If you’re not sure what your options are, explore the pros and cons of some tried-and-true kitchen design layouts.

At our Bath Plus Kitchen showroom, I like to set up a meeting with prospective clients at this point. Prior to the initial visit, we ask our clients to email us the following:

  • Photos of the current kitchen.
  • Inspirational photos and/or a summary of goals and design aesthetic.
  • Rough measurements and/or a sketch of the existing kitchen.

During this initial appointment, clients will be able to:

  • Meet and interview one of our designers to explain the project goals, learn how we work, and determine if we’re the best fit for the project.
  • Touch, feel, see our cabinetry displays and samples. Our Dura Supreme Showroom features two kitchens and a remodeled bathroom to showcase our level of design and craftsmanship.
  • Settle on a rough budget for the project, depending on the size, scope, and level of materials required.

Once this is done, my designers go on to prepare plans for the job that include photo-realistic renderings for our clients. It’s a critical step because it will give you a clear picture of the kitchen you are planning.

Dura Supreme Cabinetry design by Bath Plus Kitchen

Step 4: Select your materials

Material selection is an integral part of the kitchen remodeling process. During this step, you will need to select materials that are functional, aesthetically pleasing, and that will suit your budget. Remember that this is an investment, and cutting corners here can make you unhappy with the final outcome. It’s essential to think long-term when it comes to choosing your flooring, appliances, cabinets, light fixtures, countertops, backsplash, and other kitchen elements.

That said, there are several incredible options to choose from that will suit your budget and needs. The Bath Plus Kitchen experts believe that kitchen cabinetry can make or break a kitchen design, which is why we offer fully custom and semi-custom cabinets from a top-rated manufacturer, like Dura Supreme Cabinetry. For example, many of our clients love the versatility of the Dura Supreme cabinets that we help them customize.

Dura Supreme Cabinetry shown in the Kips door style with the “Flint” Matte Foil and the Dash door style in the “Lodge Oak” Textured TFL

Step 5: Apply for building permits

Once the kitchen design plans are drawn up, you will need to apply for building permits. I work with clients from Virginia, Maryland, and Washington, DC, and know that requirements vary based on location. That’s why it’s always best to consult your local permitting office to ensure there are no oversights and potential code violations. Your designer can help provide you with advice and help you with this process.

Dura Supreme Cabinetry design by Bath Plus Kitchen

Step 6: Complete the demolition and re-evaluate

Here’s where the real work begins. Your remodeling team will start to remove your existing kitchen – floors, cabinets, appliances, and perhaps a few walls. A good team will minimize the mess and inconvenience, which will make a massive difference to you if you opt to live at home during this time. Once this is done, your team will inspect the kitchen to see if any adjustments need to be made due to unforeseen factors such as uneven floors and other construction flaws.

Flooring work in progress in a historic Washington DC home by Bath Plus Kitchen.

Step 7: Start the plumbing and rewiring (rough-in work)

This covers the framing, plumbing, and electrical work. At this stage of the kitchen remodeling process, the focus is on the walls of the kitchens and what goes into them. Since adherence to building codes is essential here, it’s important to let the professionals decide the best way forward. A professional inspection will happen once the work is done to ensure that your remodel is up to code so the project can continue.

A beautiful corner sink in a Dura Supreme kitchen designed by Bath Plus Kitchen

Step 8: Finish the walls, doors, and windows

Once you pass the inspection, you can complete the walls. This will entail hanging, taping, finishing, and priming drywalls. Doing a thorough job here will make the next steps of the kitchen remodeling process smooth sailing. After this, you can move to the doors and windows; finishing these will ensure your measurements for the kitchen cabinetry are correct.

Step 9: Complete the flooring

Contractors choose to do this at different points during the kitchen remodeling process. Some believe it works better if done after the cabinetry, while others recommend prior. We like to make a recommendation based on each project and its unique requirements. To decide on your flooring, look up a range of options for inspiration, from the classics to the trends.

Dura Supreme Cabinetry design by Bath Plus Kitchen

Step 10: Install the cabinetry, countertops, appliances, and fixtures

This is where things start getting exciting, as you begin to see your kitchen come to life! Those materials and elements you so carefully selected will be installed. Your new kitchen cabinets, countertops, kitchen appliances, plumbing, and electrical fixtures will all fall into place, allowing you to finally see your new and improved kitchen.

Dura Supreme Kitchen design by Bath Plus Kitchen

Step 11: Add the finishing touches

Once all the major tasks are completed, it’s a good idea to go back to your list and see what’s left. You can get these done and add the finishing touches. As mentioned earlier, the flooring may be put in last, so this last step will look a little different for different projects. I recommend taking the time to check all the little details before your contractor calls it a wrap.

Dura Supreme Cabinetry design by Bath Plus Kitchen

Step 12: Say hello to your new kitchen!

This is where you remember why you wanted a remodel in the first place! Step into your new kitchen and celebrate all the hard work and brilliant ideas that went into creating a space that you will love for many years to come.

Dura Supreme Cabinetry design by Bath Plus Kitchen

A kitchen remodeling project is a major undertaking. However, when well-executed, it offers you and your family a beautiful setting in which to make wonderful, priceless memories. That’s something I’ve enjoyed helping my clients experience throughout the years with the many kitchen remodeling projects throughout the Virginia, Washington DC, and Maryland tri-state area. Get in touch with your local Dura Supreme designer to start creating the kitchen of your dreams!

Credits:

Learn more about Bath Plus Kitchen at bathpluskitchen.com.

Designer Feature: Who Says a Small Kitchen Can’t be Elegant?

Designer Feature: Who Says a Small Kitchen Can't be Elegant?

At our Dura Supreme Showroom in the Washington, DC area, Bath Plus Kitchen, each project is highly tailored to our client’s desires and requires significant attention to detail. Today I’d love to share a story about one of our smallest projects with a tremendous amount of detail.

Small Kitchen Design Washington DC

Being a small kitchen in an old building in Washington, DC posed some challenges. This historic kitchen was a 3rd-floor ‘walk-up’ meaning no elevator! There were also many of the usual quarks of older buildings, from plaster walls and ceilings that are out of plumb to outdated electrical and plumbing.

BEFORE

My clients were worn tired of the white painted cabinets of their old kitchen and wanted something unique, trendy, and luxurious. They also wanted the new kitchen to coordinate with the character of their classic home.

Dura Supreme’s Curated Color, “Rock Bottom” by Sherwin-Williams was the perfect choice for the cabinet finish. It’s moody and dramatic, yet a timeless classic hue. To call to the historic characteristics of the home, we selected the Hudson Inset door style.  Inset cabinetry is a popular and distinctive cabinetry construction style inspired by early American furniture makers and offers an authentic, hand-crafted look with timeless appeal, perfect for this historic home.

Dura Supreme’s Hudson Panel Inset door style in “Rock Bottom” paint on Turkish Carrara Marble.

With the small space, I didn’t want the kitchen appliances to overrun the look of the space. An in-cabinet European-styled refrigerator and a paneled dishwasher from Bosch were used to create a cohesive look.

My clients wanted to maximize storage space in their small kitchen. Fortunately, my team at Bath Plus Kitchen was able to use custom-fit cabinets from Dura Supreme cabinetry to make the most of the space. We were able to take advantage of the space across from the range by adding cabinets designed to fit the depth and height. Stacking the cabinetry and bringing the crown molding to the ceiling greatly expanded the storage.

The microwave storage and open shelving for pantry goods is one of my favorite features. Formerly this space was used as a lever system to bring heavy items from the floor up into the unit. The lever system was no longer functioning. During the demolition phase, my team at Bath Plus Kitchen was able to determine more space was available here than thought, which is always great news in a small kitchen.

This kitchen demonstrates what is achievable with custom-fit cabinetry. Thanks to Dura Supreme Cabinetry, my clients were thrilled to have an elegant space that fit their unique personalities and lifestyle.

CREDITS:

Learn more about Bath Plus Kitchen at bathpluskitchen.com.

Kitchen Design: Bath Plus Kitchen, Washington, DC area

Kitchen Cabinets: Dura Supreme Cabinetry featuring the Hudson Panel Inset door style in the 2022 Curated Color Collection “Rock Bottom” (SW 7062)

Cabinet Hardware: Rejuvenation hardware shown in the Unlaqured Brass Finish

Countertops: Turkish Carrara Marble with a polished finish and Eased Edge Profile

Kitchen Sink: Rohl Allia Fireclay Single Bowl Undermount Kitchen Sink

Backsplash Tile: Archtecural Ceramics 3×6 Calacatta Chablis with White polyblend grout

Kitchen Appliances: 

  • Bosch 800 Series Built-in Bottom Freezer Refrigerator (Model # B09IB81NSP) and Bosch Series 300 24” Dishwasher with 3rd Cabinet Appliance Panel Ready.
  • Breeze I Under-Cabinet range hood
  • Thor Kitchen 30″ Freestanding Professional Style Gas Range in Stainless Steel
  • Monogram Microwave Oven

Adelphi vs. Mouser Kitchen Cabinet Estimates: Comparing Costs and Features for L-Shaped Kitchens with Islands

When it comes to kitchen renovations, selecting the right cabinets is essential. Adelphi and Mouser are two popular brands offering a range of cabinet styles and finishes. In this article, we provide detailed estimates for an L-shaped kitchen with an island, featuring 25 inset cabinets in Adelphi’s Legacy door style and Mouser’s Hawthorne door style, both in a painted white finish. We will also outline additional features such as decorative paneling, crown molding, accessories, and under cabinet light rails.

Adelphi Cabinet Estimate: Legacy Door Style, Painted White Finish

Kitchen Specifications:

  • Layout: L-shaped with an island
  • Size: 200 square feet
  • Total Inset Cabinets: 25
  • Finish: Painted white Legacy door style
  • Additional Features: Decorative paneling, crown molding, accessories, under cabinet light rails

Detailed Estimate Breakdown:

Base Cabinets:

  • Sink Base Cabinet (1): $900 – $1,200
  • Drawer Base Cabinet (3): $1,300 – $1,600 each
  • Corner Base Cabinet (1): $1,600 – $1,900
  • Standard Base Cabinets (4): $700 – $900 each
  • Island Base Cabinets (4): $900 – $1,100 each

Wall Cabinets:

  • Corner Wall Cabinet (1): $1,100 – $1,300
  • Standard Wall Cabinets (6): $600 – $800 each

Tall Cabinets:

  • Pantry Cabinet (1): $2,200 – $2,700
  • Oven Cabinet (1): $2,000 – $2,400

Decorative Features & Accessories:

  • Decorative Paneling: $1,700 – $2,200
  • Crown Molding: $900 – $1,300
  • Under Cabinet Light Rails: $350 – $550
  • Pull-out Trash Bin: $350 – $450
  • Lazy Susan: $450 – $650
  • Spice Rack: $250 – $350
  • Cutlery Tray: $150 – $200

Installation & Labor:

  • Cabinet Installation: $4,500 – $6,500
  • Additional Labor (molding, paneling, etc.): $1,200 – $2,200

Total Estimated Cost:

Range: $28,000 – $38,000 (including installation and labor)

Please note that these prices are estimates based on industry averages and can vary depending on the specific dealer, location, and other factors. It is highly recommended to consult with a local Adelphi Cabinets dealer to receive a more accurate quote tailored to your project.

Mouser Kitchen Cabinet Estimate: Hawthorne Door Style, Painted White Finish

Kitchen Specifications:

  • Layout: L-shaped with an island
  • Size: 200 square feet
  • Total Inset Cabinets: 25
  • Finish: Painted white Hawthorne door style
  • Additional Features: Decorative paneling, crown molding, accessories, under cabinet light rails

Detailed Estimate Breakdown:

Base Cabinets:

  • Sink Base Cabinet (1): $800 – $1,000
  • Drawer Base Cabinet (3): $1,200 – $1,500 each
  • Corner Base Cabinet (1): $1,500 – $1,800
  • Standard Base Cabinets (4): $600 – $800 each
  • Island Base Cabinets (4): $800 – $1,000 each

Wall Cabinets:

  • Corner Wall Cabinet (1): $1,000 – $1,200
  • Standard Wall Cabinets (6): $500 – $700 each

Tall Cabinets:

  • Pantry Cabinet (1): $2,000 – $2,500
  • Oven Cabinet (1): $1,800 – $2,200

Decorative Features & Accessories:

  • Decorative Paneling: $1,500 – $2,000
  • Crown Molding: $800 – $1,200
  • Under Cabinet Light Rails: $300 – $500
  • Pull-out Trash Bin: $300 – $400
  • Lazy Susan: $400 – $600
  • Spice Rack: $200 – $300
  • Cutlery Tray: $100 – $150

Installation & Labor:

  • Cabinet Installation: $4,000 – $6,000
  • Additional Labor (molding, paneling, etc.): $1,000 – $2,000

Total Estimated Cost:

  • Range: $25,000 – $35,000 (including installation and labor)

Please note that these prices are estimates based on industry averages and can vary depending on the specific dealer, location, and other factors. It is highly recommended to consult with a local Mouser Cabinets dealer to receive a more accurate quote tailored to your project.

Conclusion:

The decision between Adelphi and Mouser kitchen cabinets ultimately depends on your personal preferences and budget. Our estimates suggest that Adelphi cabinets in the Legacy door style may cost slightly more than Mouser cabinets in the Hawthorne door style. However, both brands offer high-quality products with various customization options. It’s essential to consult with a local dealer for a more accurate quote tailored to your specific project. With the right cabinets and design, you can achieve the kitchen of your dreams.

How to Create an Eco-friendly New Kitchen Design

A well-designed kitchen becomes the heart of a home, from cooking and hosting friends and family to crafting with the kids, it’s a place to create and share. As such, the kitchen is a great place to begin when shifting towards an eco-friendly home that promotes sustainability and ethical living. If you’re looking to redesign your kitchen, there are many more options than purchasing a new, expensive suite from a chain store. With a little imagination and some eco-savvy tips, you’ll be able to create a one-of-a-kind kitchen with all the benefits and half the cost. Here’s our best advice to help you get started.

Get Creative

Using reclaimed materials is the perfect way to keep your costs and environmental impact low when designing your new kitchen. Plus, there is a whimsical charm in using repurposed materials that you just don’t find with something run-of-the-mill. An old globe stand can become a kitchen roll holder, a chest of drawers revamped into a kitchen island, and kitchen cupboards can be easily restyled with some stunning vintage cabinet knobs.

Look in charity stores and online marketplaces to find reclaimed wood, furniture and rarities that could be repurposed and given a new lease of life. If you struggle to think creatively, there is a whole ocean of inspirational upcycling ideas at your fingertips on the internet, where people have used the most unusual odds and ends to create their own stunning, eco-friendly kitchens.

Opt for energy saving fixtures

Did you know that traditional bulbs only convert around 5% of electricity they use into light? Switching to LED lights will make your kitchen far more efficient and help save you money on your electricity bill too. The longevity of LED lights make them a great choice for incorporating under-cabinets to illuminate your worktops, as they rarely, if-ever, need to be changed.

If you are looking to change your taps, many retailers offer energy saving taps which are a great investment. You could also opt for aerated taps, which reduce the flow of water by up to 10 litres per minute, meaning big savings on your water bill.

It’s worth investing in energy saving appliances for your kitchen, too. If you buy new, look for the energy rating label to help you choose. Try to get the most efficient one you can within your budget. Don’t forget that you can also look for second-hand appliances – just make sure they are still in good condition.

Make gradual changes

Redesigning an entire space is stressful enough without worrying about having to replace every non-sustainable item that you own. If you have a set of plastic bowls, throwing them into the landfill and buying some nice wooden ones is not very economical, even if it may look that way to your guests. If you are looking to update your kitchen accessories and tableware, take them to a charity shop instead of the skip. Afterall, your junk may just be another person’s treasure.

You can also simply replace items as they break or deteriorate, and opt for more sustainable options when you do. Some things, like cling film and plastic tupperware, you need never buy again if you invest in some eco-friendly alternatives such as cloth or beeswax reusable food wraps and glass or bamboo containers.

Enjoy the process

However you decide to restyle your kitchen, enjoy the process and have fun creating a greener kitchen for you and your family to share. Doing a little upcycling is great therapy for the soul, and it feels great to create something unique while also saving money.

Gloss vs. matte cabinets: What’s right for your kitchen?

You’re about to start your kitchen renovation, and are finalizing your kitchen design. You’ve made all the major decisions, down to color and material selection. The one thing you’re still debating is the finish for your cabinetry—should you choose gloss kitchen cabinets or matte kitchen cabinets?

Decor-minded homeowners usually want their kitchen cabinetry to embody both function and style. Today’s wide range of gorgeous, durable laminates gives you plenty of options, but also makes it challenging to settle on one. At Bath+Kitchen, we try to make this process as easy and pain-free for our clients as possible by explaining the pros and cons of each option and recommending materials and finishes that suit their lifestyle, considering all members of their household. 

In this blog, we’ll take you through some key points we discuss with our clients when they’re trying to choose between gloss and matte finish cabinets.

What are the key differences between gloss kitchen cabinets and matte kitchen cabinets?

Matte cabinetry by Nobilia

Today’s innovative design and high-quality laminates make it possible to achieve almost any finish you can think of. Thanks to manufacturers investing in research and testing new materials, homeowners now have a myriad of options at their fingertips, from flawless high-gloss to perfectly textured finishes.

That said, there are still some important questions to ask while choosing between finishes. Keep reading to learn what they are!

1. How do these two finishes compare in style?

Gloss finishes give the kitchen an expensive, sophisticated, contemporary/modern look. They have a sleek look that works well with clean lines to create a feeling of perfectly polished lightness. We get a lot of requests for high-gloss kitchen cabinets now because they’re more suited to a contemporary-style kitchen with flat cabinet fronts than to a traditional-style kitchen. A gloss finish also helps create a feeling of spaciousness and airiness that aligns well with a contemporary-style kitchen. 

Matte finishes are great for kitchens with a soft look—subtle reflections, soft edges, soft colors, etc. They’re an excellent choice for more traditional-style or country-style kitchen cabinets with either flat or routed fronts, because they help emphasize the wood grain with its subtle color variations. 

To sum up, a gloss finish will give your kitchen an expensive, sophisticated, and modern look. A matte finish is more subtle, soft, and cozy, and works well if your kitchen has a more traditional look. So, consider the style of your kitchen when deciding between gloss and matte cabinetry.

2. How do these two finishes compare in durability and ease of maintenance?

Today, thanks to technology and innovation, you can choose from a wide range of options with incredible durability. So, regardless of whether you choose gloss or matte, you can keep your cabinetry looking brand new for years with proper maintenance.

But there are differences that could shape your decision. Though both these finishes can be water-resistant and durable, scratches and fingerprints show up on glossy cabinets much easier than they do on matte cabinets. If you have small children or pets, high gloss cabinetry will be quite a challenge to keep clean. You could, however, choose to use a gloss finish only for your upper cabinetry, which children and (most) pets can’t reach! On the plus side, if you choose an acrylic high-gloss finish, they are moisture-resistant and UV-resistant, which means they won’t warp or fade easily.

Matte cabinets are typically easier to clean because they are less prone to scratches and fingerprints. If you have small children or pets, it’s probably best to go with matte cabinets. But be sure to check for heat resistance; vinyl laminates can give you a beautiful smooth finish, but some have poor heat resistance. Check with the cabinetry manufacturer or your kitchen designer about small appliance placement—such as electric kettles—and whether it’s possible to add a heat shield or some kind of heat protection.

3. How do these two finishes compare in price?

In general, gloss costs more. Acrylic finish laminates give you that brilliant, mirror-gloss effect, but are quite expensive. However, one thing to keep in mind is the value it can add to your home. If you are planning to rent or sell, investing in this high-end look could work in your favor. 

Matte finishes tend to be more affordable. But that doesn’t mean you’ll need to compromise on quality or look—there is a wide selection of laminates to choose from today, ranging in quality and price. Dura Supreme, a cabinet manufacturer we work with, breaks their door finishes into three main categories—contemporary, painted, and stained. We also work with Plain & Fancy, who will let you customize your color (try out their Custom Color Picker and save your favorites!), in addition to offering an exquisite selection of door styles and finishes.

At Bath+Kitchen, we only work with well-reputed, top-rated cabinetry manufacturers because we want to ensure that no matter what our clients choose, they get high-quality, beautiful cabinetry that they will love for years.

A few more factors to consider

a. Natural light: Gloss cabinetry will magnify the natural light in your kitchen. Matte finishes soften the appearance of the cabinetry while adding depth and dimension. High-gloss cabinetry can make the room feel brighter and larger than it really is; in rooms that don’t have great natural light, this can be a plus.

b. Colorful spaces: Is your space colorful? If so, gloss will reflect those colors in a way that may take away from the sleek look you’re going for. Matte finishes reflect less light than gloss finishes do, so if your kitchen is colorful, it might be easier to keep everything looking clean and uncluttered with matte finishes.

c. Flooring: Is your flooring gloss or matte? You might want to try contrasting finishes, i.e., matte cabinetry with gloss flooring, or gloss cabinetry with matte flooring.

d. Dark or light theme: Are you going for a lighter or darker kitchen? Because scratches and fingerprints show up quickly and easily on dark gloss finishes, matte may be a more practical if you’re going for a dark kitchen. If you’re choosing a lighter look, gloss could be a beautiful choice.

The best choice: The finish that suits your life

There’s no clear winner here, because choosing between gloss and matte kitchen cabinetry comes down to a few factors that are unique to you:

a. Personal style: What aligns best with your personal style and preferences? If you love high-sheen, sleek, modern looks, gloss could be the right fit for you. If you’re more at home amidst softer, cozier, more traditional looks, you may be happier with matte. So, in short, think about what you like to look at and be surrounded by.

b. Lifestyle: Consider members of your household, your schedule, how you like to entertain, and other lifestyle factors. If you have frequent visitors and small children, cabinet fonts that stay looking clean with minimal effort could be your best bet. Instead, if things in your home tend to stay neat and you only entertain occasionally, impressive cabinetry that needs more maintenance could work for you.

c. Material composition of your home: What is the general look and feel of your home? Is it softer and more traditional, or is it bold, sleek, and more contemporary? Think of the materials you use throughout your home, particularly the living room and any other spaces connected to the kitchen, before you make your decision. For example, if your current kitchen has a lot of woodwork or other natural finishes, then you might want to go with matte cabinets so that it all flows together nicely.

When we design kitchens for our clients, our design packages include an in-depth study of their home, lifestyle, goals, the changes they’re hoping to make, and their personal style. It helps us make customized recommendations, rather than simply suggesting on-trend design choices. We focus on introducing clients to exciting, innovative materials and options to help them create the kitchen of their dreams. Ready to design yours? Get in touch today!

Ultimately, deciding between gloss and matte kitchen cabinetry will come down to one thing: personal preference. Remember that a good kitchen designer won’t rush you through the process; instead, they will walk you through every design decision so that you end up with the kitchen you want.

Key references:

Storage Ideas for Tiny Kitchens

Storage can be quite a task in a small kitchen. Having a small and tight layout means that you do not have a lot of space for various things such as drawers, cabinets, shelves, storage features, and an island. In such cases, it is necessary to use every last inch of the space available in a judicious way. If you want to store more in your small kitchen, you must use some strategies that can utilise the space that you have in a wonderful way and can also enable an easy-to-use and easy-to-access storage solution. By using space saving ideas for the kitchen, you can turn a cluttered and cramped kitchen into an efficient and compact kitchen workspace.

Avoid storing everything in your tiny kitchen otherwise, it will feel cramped and small. A cluttered kitchen not only looks ugly but is also quite difficult to work in it. Reduce the number of dishes, cookware, glassware, utensils, and similar items. You can also bring down the number of appliances by removing all the appliances that you never use. Once you have decluttered your kitchen, you can use the tips mentioned in this article to redesign your kitchen. The tips mentioned here do not need a lot of money and time. You can add simple, low-cost changes to your kitchen to make it pretty and functional. Here are some low-cost simple kitchen designs to help you get started.

Open shelving.

You can increase the storage capacity of your kitchen by installing open shelves. Open shelves can transform a blank wall into a stylish, functional, and efficient storage option. These shelves can be used to store cookbooks, dishware, pantry items, and lots more. You can also put hooks on the bottom shelf to hang utensils, mugs, and other similar items. 

Dividers in cabinet space.

You can utilise the limited space in your small kitchen by using dividers. dividers, as the name suggests, divide space in your cabinets. Dividers can be vertical or horizontal. Just slide them into your cabinets and use the extra space. Dividers can help you create a more organised kitchen in no time.

Use a small kitchen island.

Add extra storage space in your kitchen with the help of a unique and custom kitchen island. Instead of having an excessively large kitchen island, try to have a smaller one that can handle everything that you throw at it. Add shelves and hooks to your kitchen island to make it multipurpose. This would help you use kitchen space efficiently.

Knives on a Magnetic Knife Strip

An easy and effective way of storing knives is by using a wall-mounted magnetic strip. While knife blocks are efficient, they are also quite bulky and can take up a lot of precious space, especially in a small kitchen. Knives are some of the most frequently used objects in a kitchen and keeping them in a handy position can save you a lot of time. By using magnetic strips you can save a lot of space and use it for anything else instead. Mount the knife magnetic strip in a location where you use knives frequently. You can also put the chopping board next to this arrangement for easy access. 

Double-duty shelf

You can use double-duty shelves in a small kitchen to use space efficiently. These shelves are versatile and can be used for a variety of purposes. You can put dishes and seasonal platters on these shelves while the lower portion can be used for daily knickknacks and spice jars. You can also use double-duty shelves in the inner portions of other storage cabinets. 

Over-the-window space

In a small kitchen, every last inch of space is important. A simple shelf over the window can prove to be a game-changer in a tiny kitchen. It can help you make your kitchen uncluttered and organised. You can also put some small plants in this place or can grow herbs that you use in your kitchen frequently. Some nice colourful vases will add a quaint charm to your kitchen.

A Tall Glass Pantry

A tall pantry with a folding door is a great way to utilise space in your small kitchen. It is also a practical method of using space and can be used to store non-perishable food items, pots, mugs, utensils, etc. You can also use these shelves to put your ovens, microwaves, and other such equipment in one single unit so that it looks organised and seamless. To take things further, install some pretty accent lights that will not only look good but will also prove to be quite functional.

Side Cabinets

Tall side cabinets can not only provide you with a lot of space but can also add a modern twist to your traditional kitchen. These cabinets are aesthetically pleasing and look stunning. They are also highly functional and can store a lot of items. Glass cabinets can be used to display plates and cutlery, or they can also be used to store groceries, packs, and other perishable items. Try to match the colour of the cabinets with the other items in the kitchen for a seamless look.

Storage Baskets on Top of the Cabinets

You can add rattan baskets on the top of cabinets to add extra space to your small kitchen. They are incredibly handy and can be used to store fresh produce such as vegetables and fruits. You can also put your spices and other similar daily-use products in these baskets for easy access. 

You can also add glass bowls and containers to store knick-knacks in your kitchen.

Smaller kitchens can benefit a lot by using vertical space. Using vertical space you can make your kitchen more functional, classy, and pretty. Be sure to choose your products and colour shades wisely so that they complement each other nicely. The small kitchen storage ideas shared in this article can help you make your kitchen look pretty and functional. 

5 Kitchen Design Ideas That your Family Will Love

The kitchen is one of my favorite areas in the house. It is where people socialize a lot, especially when people unintentionally gather in the kitchen area to cook, eat, or get some beverages. Because of this, you must consider designing their kitchen to be more relaxing, accommodating, and inviting.

Thus, whether you are building or remodeling your kitchen, the design must show your personality and the vibe that you want it to have. Here are some ideas and designs that you may add to your kitchen.

1. Install Lights and Fixtures

Homeowners mostly overlooked the kitchen, settling for only a functional area where people gather to cook food or get drinks, but the kitchen can be more than that. With lighting and fixtures, you can quickly switch the vibe from a dull and glooming area to an aesthetically inviting place.

Proper lighting also ensures safe cooking, food preparation, and cleanliness. It helps you quickly see dirt and debris that may mix with the food you are preparing. Also, it enables you to spot cracks you need to fix and areas you need to clean.

However, you need to install the lights in specific locations strategically. Placing them in particular areas in your kitchen ensures visibility, safety, and aesthetics; most importantly, they make your food look appetizing.

Aside from that, you can seamlessly secure and hide your duct system, HVAC system, and kitchen’s necessary wiring and components through duct access doors and panels.

2. Put a Kitchen Island

Homeowners may have learned the best kitchen ideas and designs on the internet. It could be through Pinterest, TikTok, Instagram, or YouTube. But whichever they get the inspiration from, building or remodeling their kitchen with a kitchen island is a win-win situation as it offers aesthetics and usability. With easy-to-access free kitchen designs online, homeowners can add endless personality and style options to the kitchen islands.

Gone are those days when kitchen islands’ only purpose is just a prep area for cooking. Today, you can utilize them as a kitchen table where you can enjoy breakfast while socializing with your family and friends or entertain guests while cooking and preparing meals.

Adding kitchen islands is perfect for people who have frequent visitors or those who love to throw parties. Add island seating, and it becomes the kitchen’s ideal spot to gather around and enjoy the moment on every occasion. So, make use of your kitchen space whether you have a smaller kitchen or not. Remodel it and add a kitchen island!

3. Set a Pet Space

Contrary to what most people believe, cats and dogs must not be in the kitchen. Interior designers made a way to ensure that the pets can freely roam around the area and drink water from their water station without worrying that they might have access to trash bins or food storage. Fortunately, there are technologically advanced bins that can keep dogs from sniffing and eating food waste and other harmful materials that may affect their well-being.

Regardless of your kitchen layout, making a pet-friendly kitchen is easy as it has a standard rule. In general, the pet’s watering station or designated area must be a couple of steps away from the busy kitchen areas to prevent them from reaching the food and simultaneously avoid any accidents.

Additionally, pet owners can add an aesthetically pleasing dog nook that matches and blends seamlessly with their kitchen design if the kitchen has extra space. However, pet owners must ensure that the kitchen area is always clean and that the cleaning solutions, pointy and sharp tools, utensils, and poisonous and toxic food and chemicals are out of the pet’s reach.

4. Invest in Organization's System

Organizing your kitchen is an underrated idea, but it can surely make it look clean, orderly, and pleasing. While the kitchen’s vibe is the product of its design, the organization system makes it attractive for guests.

But the primary advantage of organizing your kitchen is knowing when the food expires. The First In, First Out (FIFO) method, which requires you to label food and beverages, will help you track the spoilage date, which food you need to keep, and which you need to throw away. With this method, you can also keep track of your groceries, making it easier to identify and list what you need to buy.

5. Consider Installing Walk-in Pantries

You must consider adding customizable walk-in pantries to organize and stock multiple non-perishable items in your kitchen. By adding it, you can guarantee that you have enough space to keep food items that you need until the next grocery date.

Its capacity also serves as extra storage areas for appliances and supplies you do not usually use, freeing some space in your countertops and cabinets. Thus, if you have a family of five or more or someone who buys groceries in bulk, consider installing a walk-in pantry in your kitchen to store and organize your weekly or monthly stocks in one place. 

Keep in mind that kitchen designs must address the area’s aesthetics, storage, cleanliness, and efficiency. May the five kitchen design ideas help you decide which kitchen design you will add to maximize its space and enhance its ambiance.

Remodel Review: Waypoint vs. Dura Supreme Cabinetry

Arlington Kitchen Design

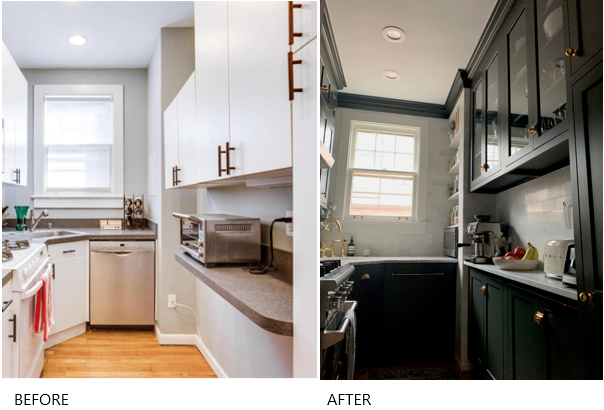
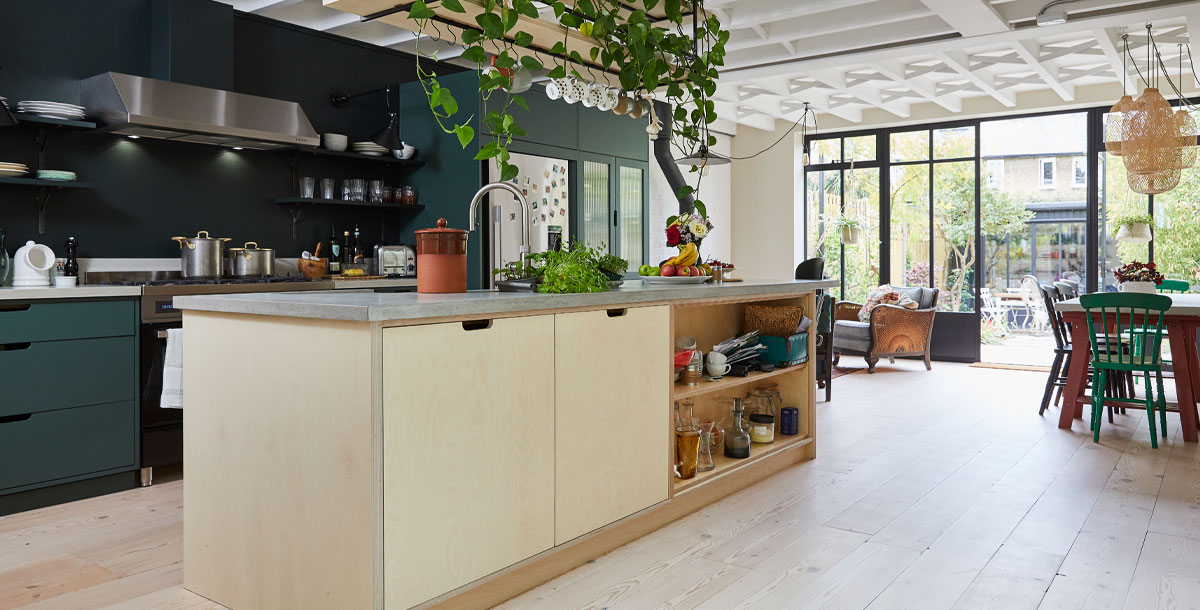
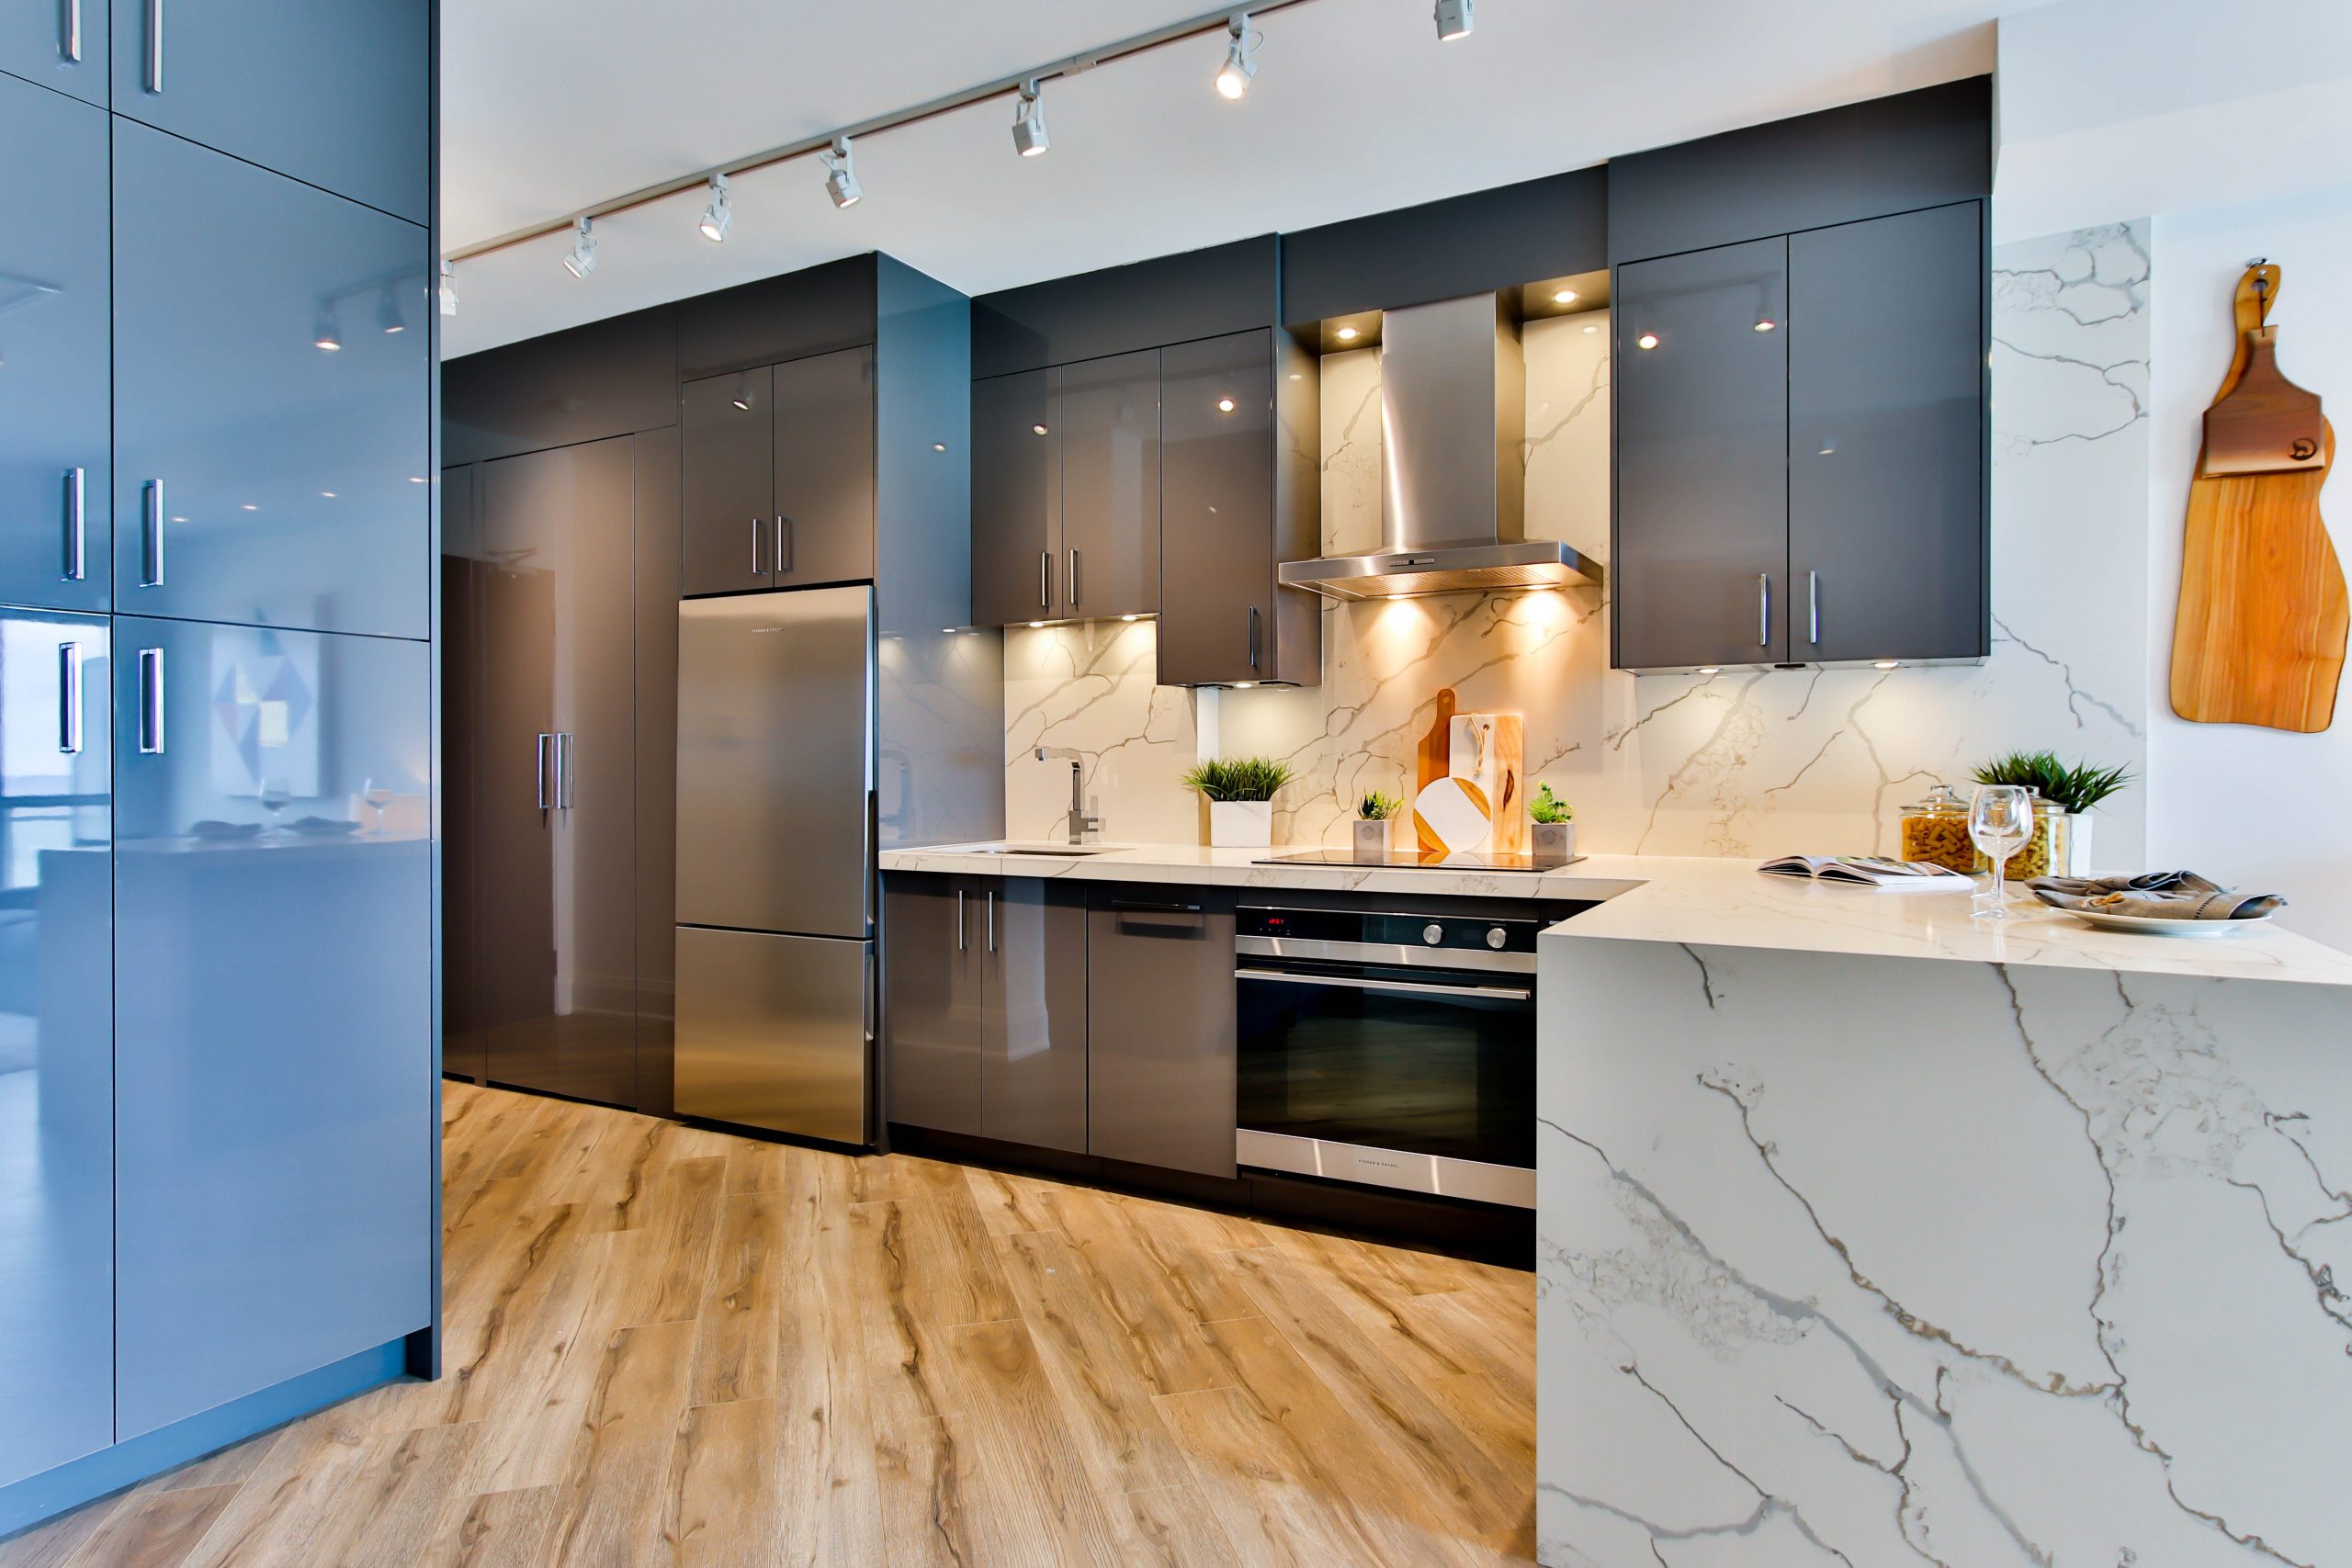
Same kitchen, same aesthetic, same designer, different cabinetry lines. What does that look like?

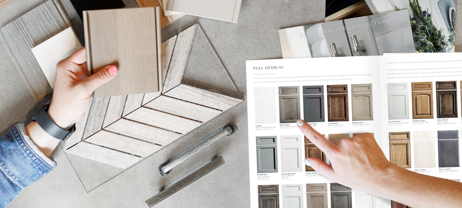
When a client came to us for a kitchen remodel, we worked on a few renderings, showing what different cabinetry lines can offer them. Here’s a look at the same kitchen with two different lines – Waypoint’s stock cabinetry, which allows some modifications, and Dura Supreme’s custom cabinetry.

Waypoint (stock cabinetry with some modifications)

Stock cabinetry is pre-built and sold at stores or directly by manufacturers. They have more readily-available designs and sizes than custom cabinets. The downside, though, is that they don’t always fit perfectly into your space, so you need to be prepared to make some compromises.

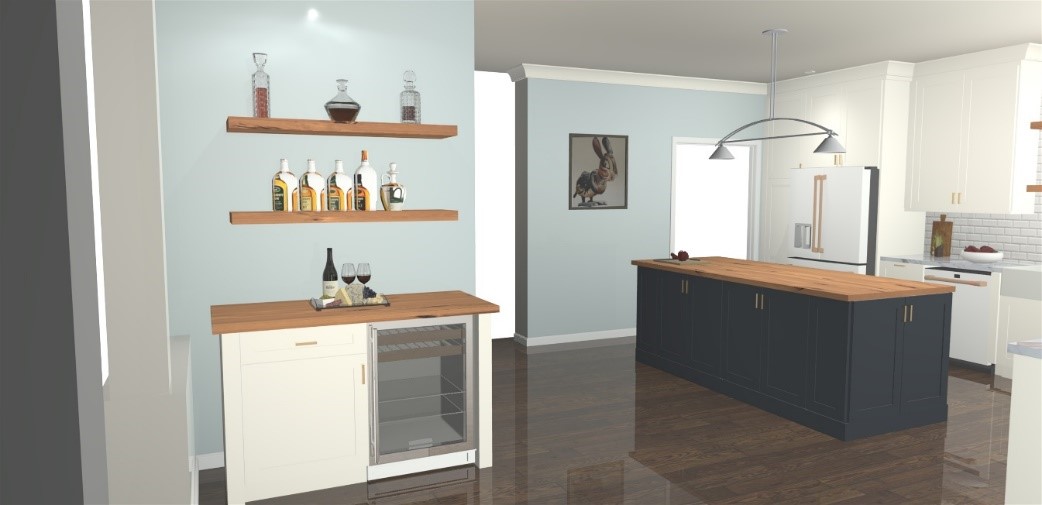
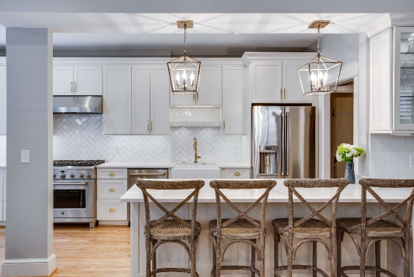
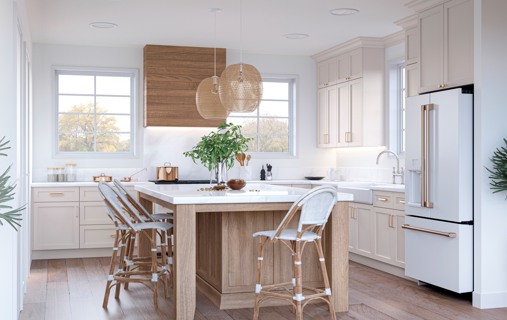
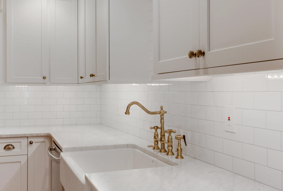
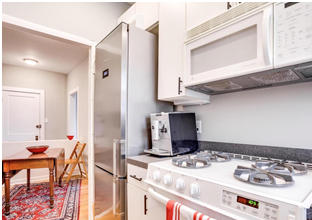
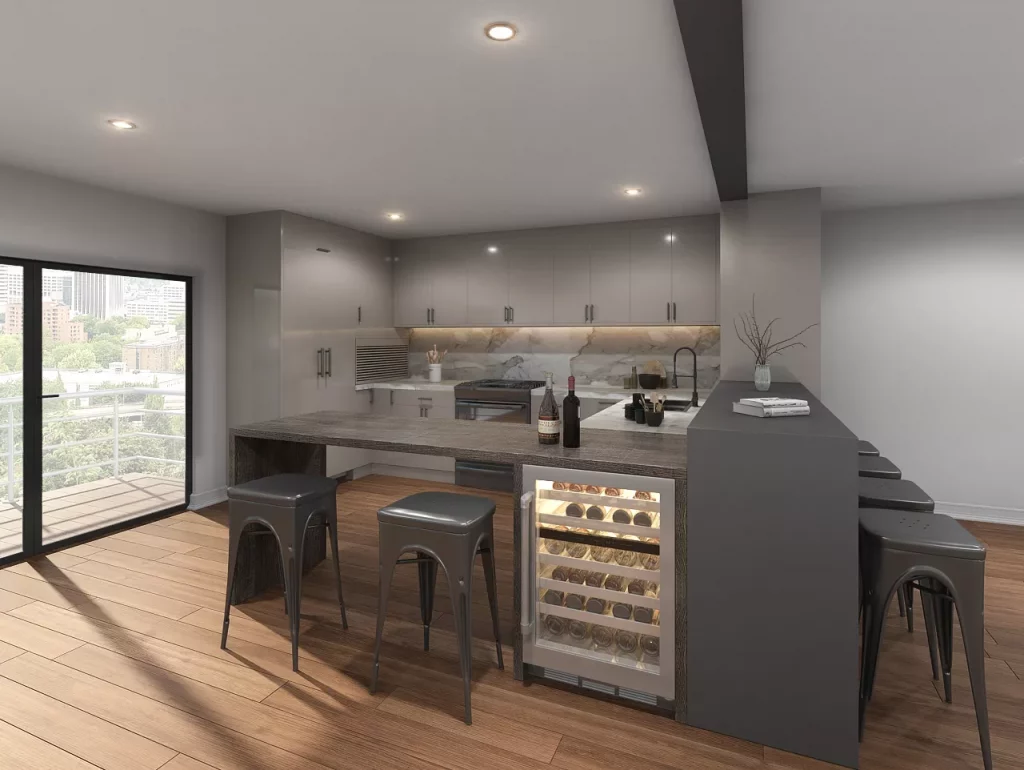
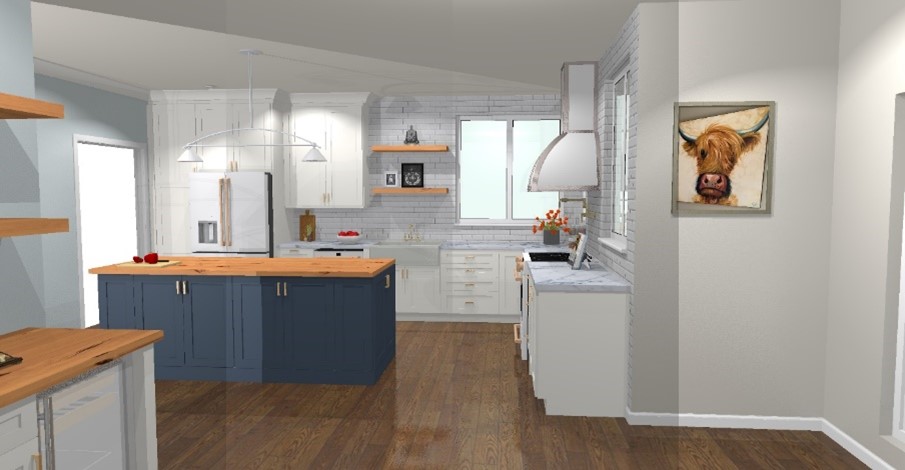
Client’s kitchen, rendering with Waypoint.

Dura Supreme (semi-custom/custom cabinetry)

With custom cabinetry, manufacturers work with different dimensions and layouts based on the customer’s unique needs and preferences. It is expensive in the short run, but tends to be better value in the long run, because it can be designed to fit your space perfectly; it won’t restrict or hinder your kitchen functionality or flow, so you won’t need to replace it in a hurry. Custom cabinetry gives you more options in terms of design, material, size, and finish.

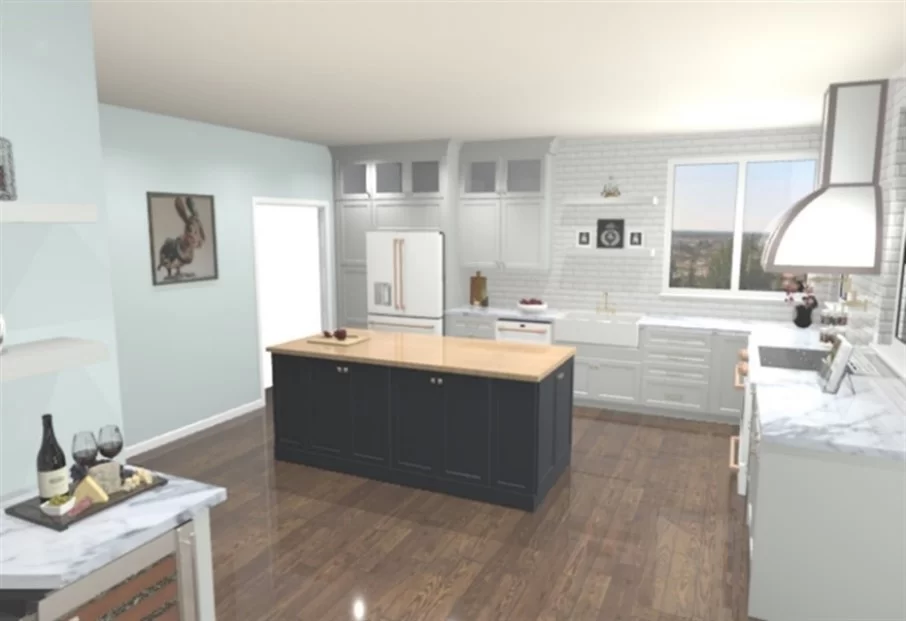
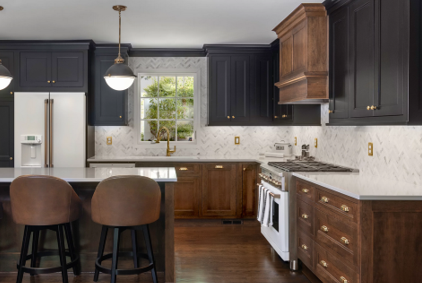
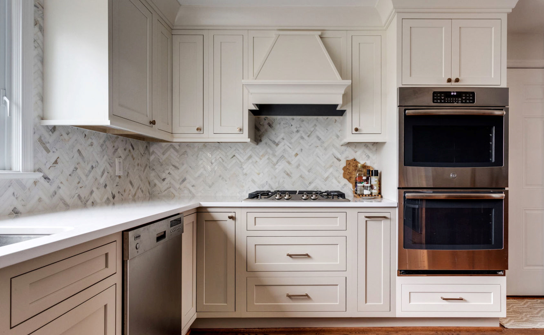
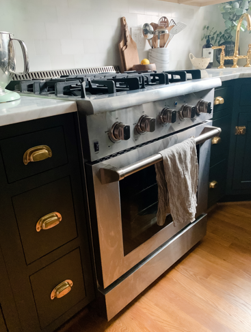
Client’s kitchen, rendering with Dura Supreme

Helping our clients make the best decision

In general, there are a few things that go into choosing a cabinetry line:

  • Budget – This is another important factor. We help our clients compare pricing. We also create renderings because we believe our clients should be able to see what they get at different price points before making a final decision. Learn more about kitchen cabinetry costs and the design choices that affect them.
  • Design – Once a client knows which cabinetry lines can deliver what they want on time and within budget, they can compare the final look and feel, as well as little details and differences between them.


Through our consultation process, we share relevant information and high-quality renderings to help our clients make the right choice.

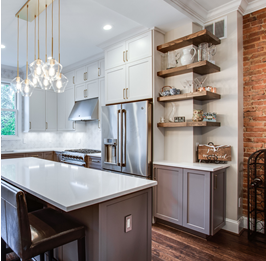
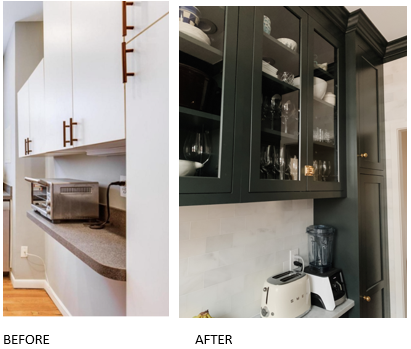
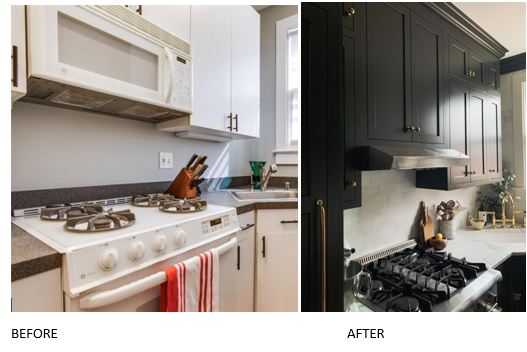
What did the client choose?

After considering all the information we offered and evaluating the renderings, the client chose Waypoint. This cabinet line offers a lower lead time and price point than Dura Supreme does, which makes it a practical choice. They’re able to do this because they offer stock cabinets with some modifications.

What we love about Waypoint

While Waypoint cabinetry gives you the benefits of stock – lower cost and lead time – it does not compromise on quality. Made in America, as opposed to mass-produced in China, Waypoint cabinetry is made to last; all Waypoint cabinets come standard with plywood ends so they’ll stand up to years of use. While custom cabinetry may sometimes be beyond reach, we believe quality never should be.

Waypoint also has well-thought-out options and modifications that give us a good degree of flexibility as kitchen designers such as:
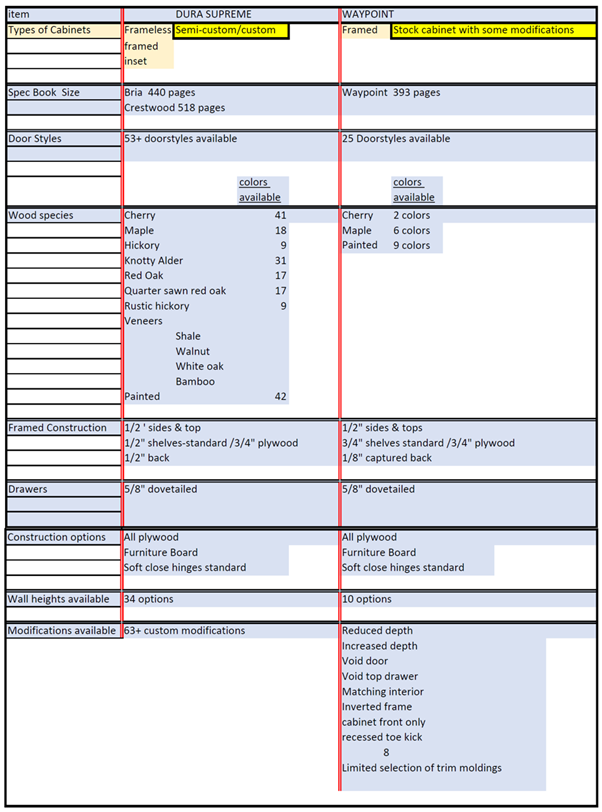
  • 25 door styles
  • 3 finishes – Cherry, Maple, and painted.
  • 10 wall height options
  • 8 modifications:
    • Reduced depth
    • Increased depth
    • Void door
    • Void top drawer
    • Matching interior
    • Inverted frame
    • Cabinet front only
    • Recessed toe kick

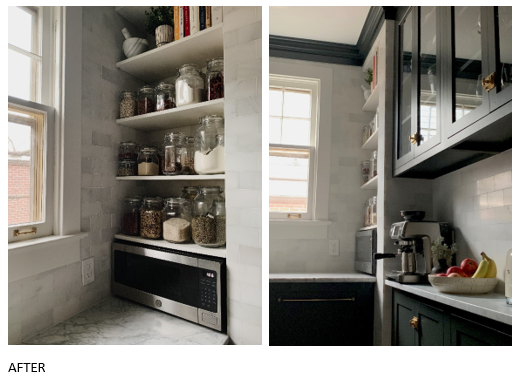
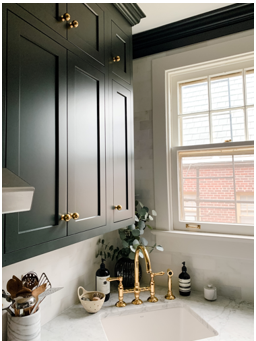
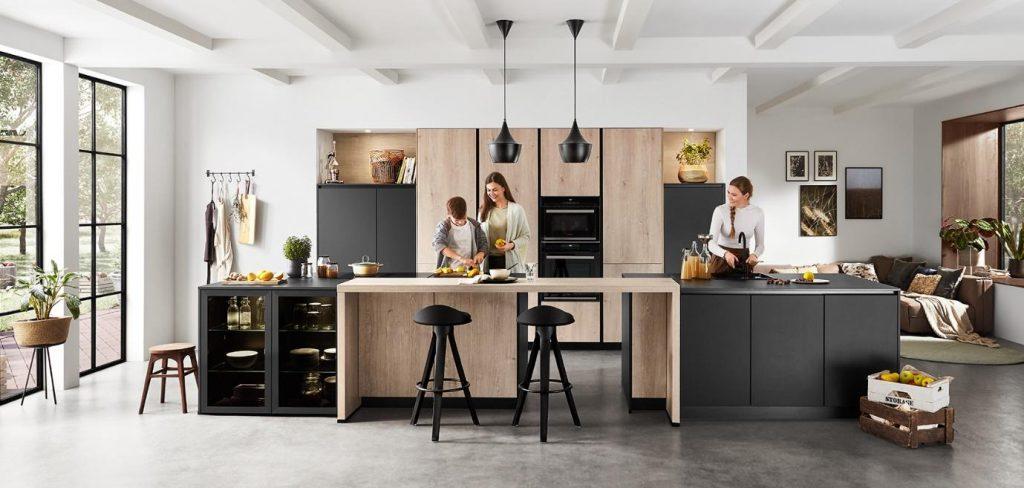
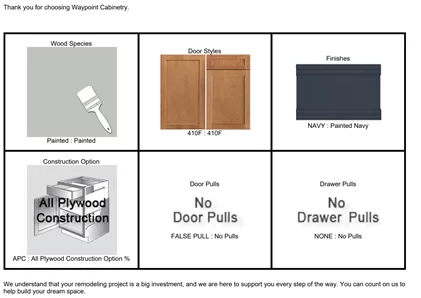
These options made it possible to give our clients what they were looking for. Here’s what they selected:

We did, however, encounter certain challenges with Waypoint in this kitchen.

Challenges we faced working with Waypoint’s options.

  1. They don’t offer taller wall cabinets.
  2. They don’t offer wood tops, so those had to be sourced separately.
  3. We couldn’t customize widths and heights

These are some issues that have to be worked around while installing stock cabinetry. Because we are committed to working with only top-rated manufacturers, you know you’ll get high-quality, beautiful cabinetry no matter which of our cabinetry lines you choose. However, semi-custom and custom cabinetry certainly have their pros.

Would Dura Supreme have had any advantages over Waypoint in this design?

      1. Customizable widths and heights for a better fit.

Dura Supreme lets you customize widths and heights, which would have helped us overcome some of the challenges we encountered in this client’s kitchen with Waypoint. Better customization options make Dura Supreme easier for us to work with as we design your dream kitchen – it helps us give customers the best possible recommendation to create your perfect kitchen.

      2. Framed as well as frameless

Durapoint offers both framed and frameless cabinetry, while Waypoint only offers framed. Take a look at the cabinet specs below to see the difference.
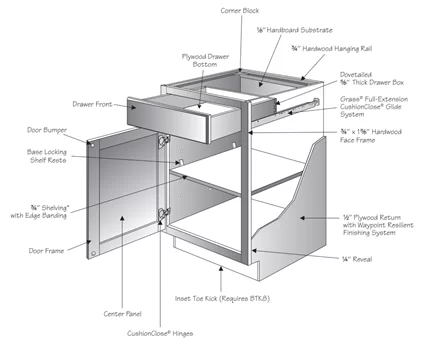
Waypoint specs

Here’s a drawing of a standard Waypoint base cabinet. They are constructed using high-quality materials and hardware, making them a good option if you want framed cabinetry. They don’t, however, offer frameless cabinetry, which lends itself well to contemporary kitchen styles.

Read: 2021 kitchen cabinetry trends to refresh your home
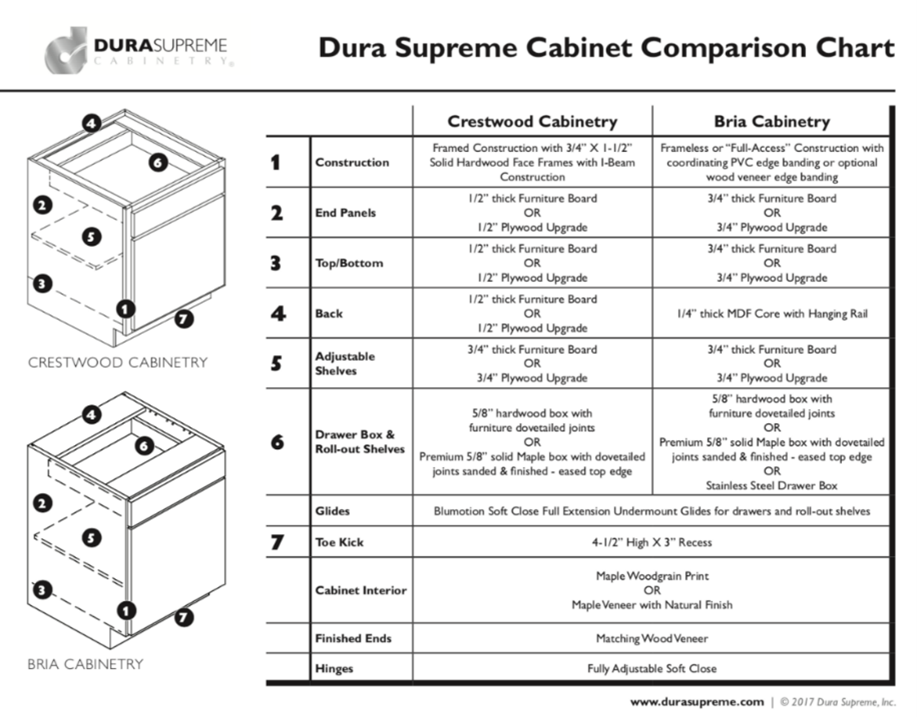
Dura Supreme specs

Dura Supreme offers both framed and frameless cabinetry, as seen below.
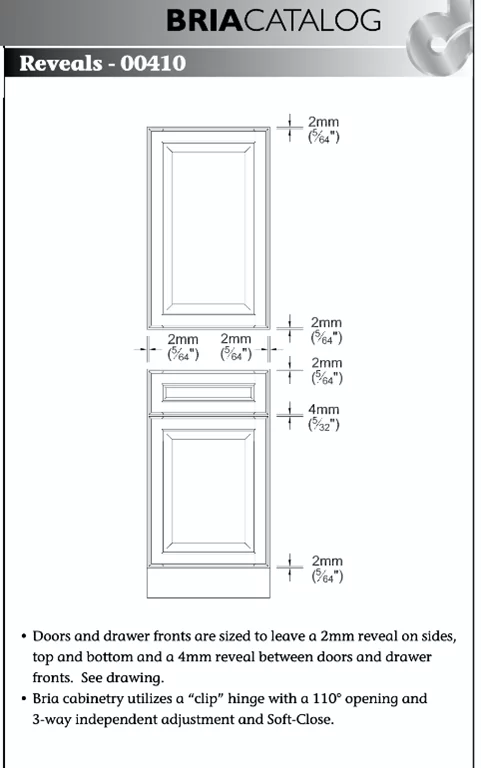
       3. Tighter reveals

The space between doors, drawers, and cabinets, or “reveal”, is tighter in full-overlay Dura Supreme cabinetry than in Waypoint’s. This creates an overall cleaner look, as shown below:

       4. Paintable door that retains its smooth finish

Dura Supreme offers a paintable door made of a high-density fiberboard. The benefit of this material is that it does not expand and contract. Waypoint, on the other hand, only offers painted cabinetry in a maple species; with this option, there is the risk of hairline fractures wherever you have joints.

      5. A wider range of options for door styles, finishes, and more

In addition to offering both framed and frameless, Dura Supreme gives you many choices to help you achieve the look you want:

  • 53+ door styles
  • Multiple wood species and paint options
  • 34 wall height options
  • 63+ custom modifications.

With Dura Supreme, you are sure to get quality cabinets with lots of options for your home. They have been producing quality kitchen cabinets for over 50 years, and our clients love them. They deliver the perfect balance of precision, quality, and value, allowing their clients the options they want without breaking the bank.

Here’s a more detailed comparison of what Dura Supreme offers as compared to Waypoint.

Reasons you may end up replacing stock cabinetry sooner than you think

With cabinetry by top-rated manufacturers such as Waypoint, you can rest assured that they will last. Their selection is well-designed, made from quality materials. But durability alone doesn’t shorten the lifespan of your kitchen cabinetry; there are many other reasons you may end up replacing them, most likely with custom cabinetry that will solve the issues inherent to stock cabinetry. Here are three:

  1. They look outdated

Limited options can often mean compromising on getting the right aesthetic. In the client’s kitchen we showed you in this blog, framed vs. frameless is an example of how you may need to accept an older style when purchasing stock. The frameless options Dura Supreme offers look sleek and contemporary, which would give your kitchen a much more up-to-date look. If you pick a style that’s already on its way out, chances are, you’ll find your kitchen looking outdated much sooner than expected. As a result, you may start thinking of new cabinetry fairly soon. Choosing custom cabinetry, on the other hand, could keep your kitchen looking new for much longer.

  1. Better organization

Custom cabinetry means custom organization. Everyone has a unique set of requirements and preferences when it comes to how drawers and shelves are set up. Custom cabinetry allows you to dive into these details and make sure your space is tailored beautifully to your specific needs. With stock, you’ll get a good setup, but you may find yourself changing how you store and arrange things in your kitchen to suit the cabinetry rather than having it designed to suit you.

  1. Other upgrades at home

Over time, you are likely to upgrade your kitchen and home with sleeker appliances and better quality items, i.e, nicer things. You may reach a point where your cabinetry doesn’t fit in with the evolving look and feel of your space. When that happens, you’re likely to start rethinking your cabinetry and wanting to up the luxe factor to align with the rest of your space.

Verdict

Choosing a manufacturer such as Waypoint can certainly help you achieve a beautiful kitchen on time and on budget that suits you now. However, it may not be the right fit for you down the road, not too far into the future. That’s why we always encourage our clients to envision the space they really want as part of their remodel preparation process. It helps to think a few steps ahead!

Budget and time permitting, we believe exploring custom options offered by a manufacturer such as Dura Supreme can give you better results in the long run.

Of course, at the end of the day, it comes down to what you want to accomplish within a certain timeframe and budget. With a strong design team and high-quality cabinetry lines like ours, you’re sure to find the best way forward for your kitchen remodel at a price point that suits you, with beautiful results guaranteed.

Want our expert recommendations on your new kitchen? Get in touch with us here.